Below is the ithermometer manual writtern for easy understanding.
CAUTION
This product is a consumer electronic product, and is for auxiliary temperature monitoring only.
This product cannot be used for intensive care, and the case may lead to major medical malpractice.
The monitor data cannot be used for medical and clinical diagnostics.
DANGER
It is dangerous to wrap the bandage around the neck, and may lead to suffocation and death. It may also lead discomfort when the bandage is wrapped too tight. Please read this manual carefully in order to understand the proper use of the bandage. Do not place the product in a place where children can get it.
Features
- Bluetooth connection with Android mobile phone
- Real time body temperature monitor
- History data curve for body temperature
- Body temperature guard and alarm
- Comfortable for wearing
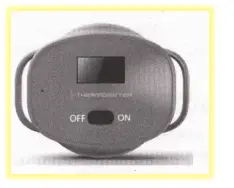
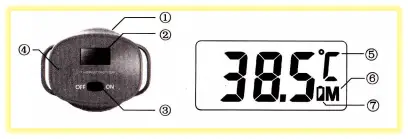
Appearance
- Charge port
- LCD window
- Power switch
- Temperature unit setting button
- Temperature unit flag
- Connecting status flag
- Low battery flag
Operations
Switch ON and auto sample
Put the power switch (3) to “ON” to turn on iThermometer. The device will be ready to be connected, and start temperature sample every 10 seconds automatically.
The LCD shows “Lo.” when the temperature is lower than 35’C /95°F, and “Hi.” when higher than 43’C/109.4°F.
To get the proper body temperature, please wear it for at least 25 minutes.
Temperature unit setting
Press the temperature unit setting button hidden in the hole (4) by a paper clip or a needle to set the temperature unit, and the temperature unit flag (5) will toggle between ‘C and T.
Battery and charge
The low battery flag (7) will show when the battery needs to be charged. To charge the battery, plug the charge head into the charge port (1)), and the USB head into an USB charger or an USB port of a computer. While charging, only the low battery flag (7) will be shown on the LCD, which will cost about 2 hours. The low battery flag (7) will be shut off when charge is finished. Because the battery will get hot during charging, iThermometer will neither read the temperature, nor display it.
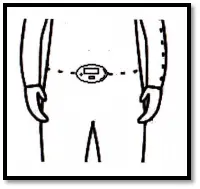
How to wear iThermometer
Put iThermometer on the lower abdomen, and adjust the length of the bandage, not too tight, and not too loose. As shown in the ithermometer manual below:
Android Application – iThermometer
Download and install the application
In your android mobile phone, which should be above android 2.2, input the URL below in the web explorer, or scan the QR code on the back cover of this manual.
www.iThermometer.info/it2401/iThermometer.apk
The application will be downloaded automatically.
Follow the android instructions to install the application.
Use the iThermometer
Pair to iThermometer device
The iThermometer device needs to be paired with the phone. Follow these steps to get iThermometer paired:
In “Settings”->”Wireless & networks”->Bluetooth settings’, press “Bluetooth” to Turn on Bluetooth, and then press “scan for devices” to find the iThermometer device.
The iThermometer device name should be like “ixxxxxxx”, which start with “i”, and followed a 7-digits number.
Press the iThermometer device to pair it with the PIN ”0000″.
Run the application
Once the iThermometer device is paired, please press the icon
To start the iThermometer application.
Please choose <Yes> if the Bluetooth permission request message is shown.
Connect iThermometer
In the <Option> page, press <Device select> in the bottom of this page. Find the iThermometer device just paired, named as “ixxxxxxx”, and press <Connect>. A message “Connect or will flash for a few seconds, and the connecting status flag “M” will appear on the iThermometer device if connected. Remember to press <OK> button in the bottom of <Option> page to save the setting.
The application will start to connect iThermometer device automatically when the connection is broken. Press <Cancel> button in the popup window to stop connecting.
Read temperature
In the <Main> page, the body temperature will be refreshed every 10 seconds.
You can also hide the application by press the back key of your phone, and choose “Hide” in the popup window.
The iThermometer device will send temperature data every minute to save the power in the hidden mode.
Connection status and battery level
The connection status is shown at the top left of the <Main> page. The Bluetooth icon will be colored while it is connected, and grey while disconnected.
The battery level icon shows the battery level of the iThermometer device, on the top right of the <Main> page.
When the battery is low, please charge the device at once, as low battery may lead to wrong data of temperature.
History body temperature chart
Press <Chart> to view history body temperature chart. Slide left or right to view earlier or later temperature chart.
Temperature cannot be seen when the temperature is beyond 35t-43t /95T —109.4T.
Options
In the <Option> page, you can change the settings below:
- Temperature unit
- Alarm temperature
- Phone number for alarm call and SMS
- Alarm actions:
- Sound
- Vibration
- Phone call
- SMS
- Device select
Remember to press <OK> button to save the change.
Hide and exit
Press <Menu>, and then <Home> to hide the application,
<About> to show the information about us, <Exit> to exit the application.
Technical Specification
| General | |
| Model No | CVXX-A140 |
| Android OS version | Above Android 2.2 |
| Temperature | |
| Range | 35.0C -43.0C/95F – 109.4F |
| Absolute precision | 0.2C/0.36F |
| Relative precision | 0.1C/0.18F |
| Temperature unit | C/F |
| Battery | |
| Charge volt | 5V |
| Charge current | > 80mA |
| Charge time | 2 hours |
| Use time (full charged) | 48 hours |
| Bluetooth | |
| Bluetooth specification | 2.1+EDR, class 2 |