Thank you for purchasing this solar charger, which is constructed with integrated 12000mAh Li-polymer battery. This solar charger is water-proof, dust-proof and shock-proof.
Please carefully read this manual before operating your solar charger and keep it for future reference. The user guide will help you use it properly, safely and take full advantage of its features.
Product Illustration and Features
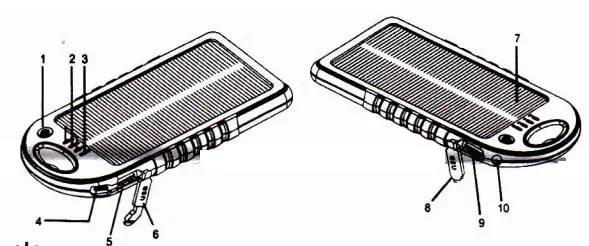
- 0N/OFF, Fluorescence background of switch button.
Click-ready to charge and the blue indicators show the remaining power.
- Blue on – remaining power; Blue blinking – being charged
- Green on – charging via solar panel; Blue on remaining power;
Blue blinking – solar charger needs to be recharged.
- Micro input for charging the solar charger’s built -in battery
- USB1 onput for charging electronic devices
- USB1 sealed cap
- Solar Panel
- USB2 sealed cap
- USB2 output for charging electronic devices
- LED torch
Double-click the switch to turn on the LED torch; Press the switch again for SOS flash light; Third press to turn off the SOS light; Double-click the switch again to turn off the LED torch.
Specifications
- Battery Capacity: 12000mAh Li-polymer battery
- Solar Panel: 5V, 280mA
- Input: DC 5V1 1A
- Output: DC 5V/ 2X 1A
- Dimension: 167X 89 X18mm

Operating Instructions
How to charge the solar charger?
Charge the solar charger via an external power source
- Connect the solar charger’s cable to a computer or laptop USB port (Connect the solar charger with a computer, laptop or other devices that have an USB port)
- After connected, blue LED indicators light on to indicate that the solar charge is under charging.
- When the solar charger is fully charged, LED indicators go off.
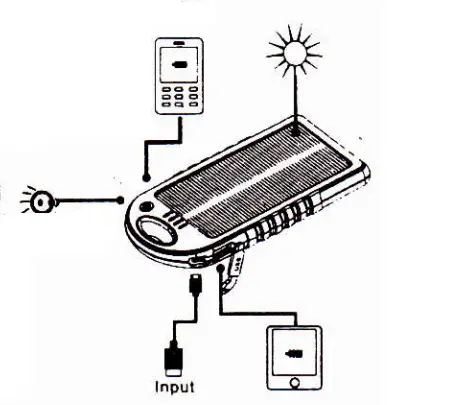
Charge the solar charger via its set solar panel
Click the ON/OFF button to check the power reserve status
- Place the solar charger in sunlight.
- The green LED indicator will keep on when the solar charger is being charged in sunlight.
Charging an external device via the solar charger
- Check that the solar charger is adequately charged by pressing I/O. The battery charge status is indicated by the LED:
1st LED indicator – green, which is keeping on when it being charged in
Sunlight – blue, 25% power
2nd LED indicator- blue, 50% power
3rd LED indicator – blue, 75% power
4th LED indicator – blue, 100% power
- LED indicators will turn off after 20 seconds if full charging
- The solar charger needs to be fully charged if you wish to utilize both USB ports and charge two devices simultaneously.
- It provides about 20% —30% capacity of I Phone for emergency after being solar charged 8 or 9 hours in normal sunlight.
NOTE: When the solar charger is in use and its battery charge level is very low, the solar charger will automatically shut off in order to protect its battery from a deep discharge. When the solar charge begins to recharge, it takes 3 minutes before it can output any charging current.
Safety
- Once the remaining power reaches at/above 75% (3 or more blue indicators on), please do not charge the solar charger via solar panel in sunshine (In case that the serious damage may take to li-polymer battery by continuous high temperature and charging current, which may lead to over-voltage and battery swelling up).
- Never attempt to open or dismantle the solar charger.
- Never deliberately knock the solar charger.
- Don’t leave the solar charger in airtight space like in a car. In which the temperature would be over 45°C when charging via solar panel.
- Do not throw the solar charger into fire.
- If any improper use or any operation against the user manual, we will not be responsible for the problems
- We reserve all the rights for the final explanation.